
The good outcome was that I could see that it was possible to do the job in the space available, but my results would annoy me for ever after.
Some comments on social media about my welding skills, probably from those who never have had a go at it, were a little non productive, I am sorry for those who can only put down the efforts of someone trying something new. A failed effort is just a starting point to having another go at it.
The reasons for my failure, that is apart from my lack of skill with the electric welding process, were probably due to trying to cut corners on equipment.
I am fairly competent with the oxy-acetylene welding process as used in panel repair work. Welding up exhaust pipes is easy enough with this process. However joining said 1.6 wall pipes to 10 mm thick flange plates is a challenge. The arc welder it really the only way and care is needed to make sure the heat goes to the heavy part so as not to make unwanted holes in the thinner material.
I was also working with the wrong equipment as the hire of gas bottles is very expensive and I was trying to reduce this cost by welding with Oxy-propane. The "experts" were right, it doesn't work. You can make a weld the the oxidising nature of the flame gives a weak crystaline weld while the Oxy-Acetylene flame can be adjusted slightly carbonising to give far better results.
I have since found a supplier who will provide gas at a reasonable price
Thank you to the nice people at BOC


I viewed a Good Ol' boy U tube showing old school exhaust pipe bending for his truck with sand and heat from a charcoal or coke brazier.
I learned what I had been doing incorrectly and understood the less than perfect results I achieved with this process in the past.
Apparently the trick is to compress the sand so I created the device in the picture which fits into one end of the pipe and is secured with a couple of solid tack welds.
The pictured item is for 2" pipe which I needed but made in error as my primary focus was on bending some 41mm pipe to match the holes in the Alpine dual outlet manifold I wanted to use in place of the single outlet Vogue item.
The pictured item is for 2" pipe which I needed but made in error as my primary focus was on bending some 41mm pipe to match the holes in the Alpine dual outlet manifold I wanted to use in place of the single outlet Vogue item.
So I started out to make it fit the smaller pipe and quickly realised that it was simpler to make a new one the right size. Pictures will follow :-)
Having packed the sand in the pipe and welded a plug across the distant end.
Long story here as I thought I would align the threaded bit by extending if fully and welding it together while slipped into the pipe. My welds attached it firmly to the guide pipe and rather than fight with it I simply left it attached and filled the pipe from the far end before capping it.
Having got it in place I screwed it fully out before filling the pipe with sand.
What surprised me was I used the entire 2 feet (600mm) of thread when compressing the sand.
I screwed it in about 4 inches and tapped the pipe along the length gently and found it would screw in another 4" and repeat. Finally tapping the pipe to seat the sand only achieved 25 mm so I guess that is tight enough.
I wondered if I could cold bend it with the sand in place like this but I had lent my pipe bender to somebody a while back and couldn't remember who. They also forgot who it belonged too and failed to return it. Moral of story never lend tools :-)
I took the time to have a look at what is so special about Mandrel bending and again learning something new. The process of mandrel bending is totally different from what we could call hydraulic bending.
The Mandrel bending process uses linked round balls inside the tube to prevent it crushing or kinking but the bend process involves clamping the lead in end and drawing the tube around a former which creates a bend with no distortion or reduction of the tubing shape or cross sectional area.
I don't have the expensive equipment to do this so heating and bending will have to suffice.
Probably would have been less aggravation just getting the experts to do it and pay the money, but where is the fun in that??
So before applying heat and burning fingers I need to create a bending jig, table, device that is attached to the ground or sufficiently heavy to stay in place when I start bending the hot pipe. Like concrete formwork you need to have it right before the event.
The plan is to heat the pipe, slip the end into a former and pull the end around to the required curve.
About 6" radius bend should work well. The two downpipes should be around 24" long according to my design. The primary lengths in the manifold work out around 13 inches each the secondary (downpipes) should be double that. On a Rootes' 1600 a good street extractor using tubing would be 1.125 dia primaries 18" long and 1.25" secondaries 24" long.
So I am close to these "sweet" numbers.
I notice the Alpine set up uses much shorter downpipes before joining then into a single outlet.
It could be interesting to compare the designs on a dyno if I had one
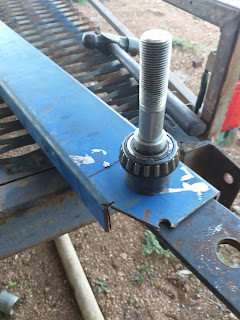
 Looking at pictures of the professional pipe benders and considering the radius bend I wanted I found a Holden HQ front hub that was the right size. Mounting the Holden upright was a little inconvenient so I created a stub axle from a 3.4 UNF bolt and a few odd pieces of pipe.
It does help having a lathe to make them the right size and shape.
I attached it to the car trailer as my workbench is not bolted down so it will not stay put when I start bending the pipe.
Throw some heat at the pipe tomorrow and see how we go.
Put the pipe out ion the sun for 10 minutes and it is already close to bend temperature :-)
It could be interesting to compare the designs on a dyno if I had one


It does help having a lathe to make them the right size and shape.
I attached it to the car trailer as my workbench is not bolted down so it will not stay put when I start bending the pipe.
Throw some heat at the pipe tomorrow and see how we go.
Put the pipe out ion the sun for 10 minutes and it is already close to bend temperature :-)


Step one make a sand compressor to enable exhaust pipe bends to happen.
ReplyDelete